Monday, August 9, 2010

Getting Ready for DragonCon

Can you believe it's August already?!? And what comes after August? Why DragonCon of course! For those of you not familiar with DragonCon, it's a "...multi-genre convention held annually in Atlanta, GA" blah blah blah 30,000 people... blah blah blah $25 million economic impact in 2008 blah blah blah. (Check out the site here, or a brief synopsis on Wikipedia here.)
Surprisingly, I didn't know about DragonCon until I moved here, but if I was the teenager I was back then in today's day and age, I'd be all over DragonCon (and would lose whatever bit of non-geek cred I had!) Anyway, it's a 4 day convention that takes place over Labor Day weekend every year. It's geared toward sci-fi and fantasy, but really if you're into anything you can probably find it at Dragon. And that means comics, too. My husband and I usually work a day or two for our local comic book shop Titan Games and Comics which means we get free passes to wander around AND they let me set up my jewelry and such at their booth (they're good about taking pity on me!) So this year, with the success of the comic book bowls and decoupaged bracelets at Heroes Con in June, I've decided to get my butt in gear and make as many as I can for Dragon.
This was one of my first bowls
I already posted the tutorials for the decoupaged bracelets and the upcycled necklaces, so it's time to talk about the bowls.
I'm trying a bit of a different approach to the Dragon batch. The bowls I made for Heroes Con were made with paper pulp which involved a lot of strain and stress on my blender.
Not a great pic - but here's the Conan bowl
The ones I'm making for Dragon will be a more traditional paper mache version with comic book images decoupaged on top (I really do like to decoupage!)
I'm using old Previews catalogs as my base so the bowls are still made from recycled materials.
I use the guillotine paper cutter to chop up the pages into squares/rectangles - I'm experimenting with shapes and sizes. One site said to make sure the pieces were square and no bigger than 1/2"; another site said 2 1/2" x 1 1/2" rectangles, so I'm working somewhere in the middle.
I got a little overexcited last night chopping up pieces and came down on my finger. LUCKILY my paper cutter does not have a sharpened blade! It just caused a big dent on my thumb. My husband made me take a break for a while.
I'm using a 1:1 ratio of water and white glue. I started with el cheapo glue that I picked up at Hobby Lobby and then hit a back to school sale on Elmer's at Publix. I haven't decided which one I like better yet. I will say the cheap glue mixes better with the water, but the Elmer's seems to stick better.
I picked out several bowls from the cupboard with various shapes and sizes. I covered the outsides of the bowls with plastic wrap pulled tight and smoothed down as much as possible and taped on the inside.
Oh yeah, do yourself a favor and cover your work area with plastic - this gets messy!
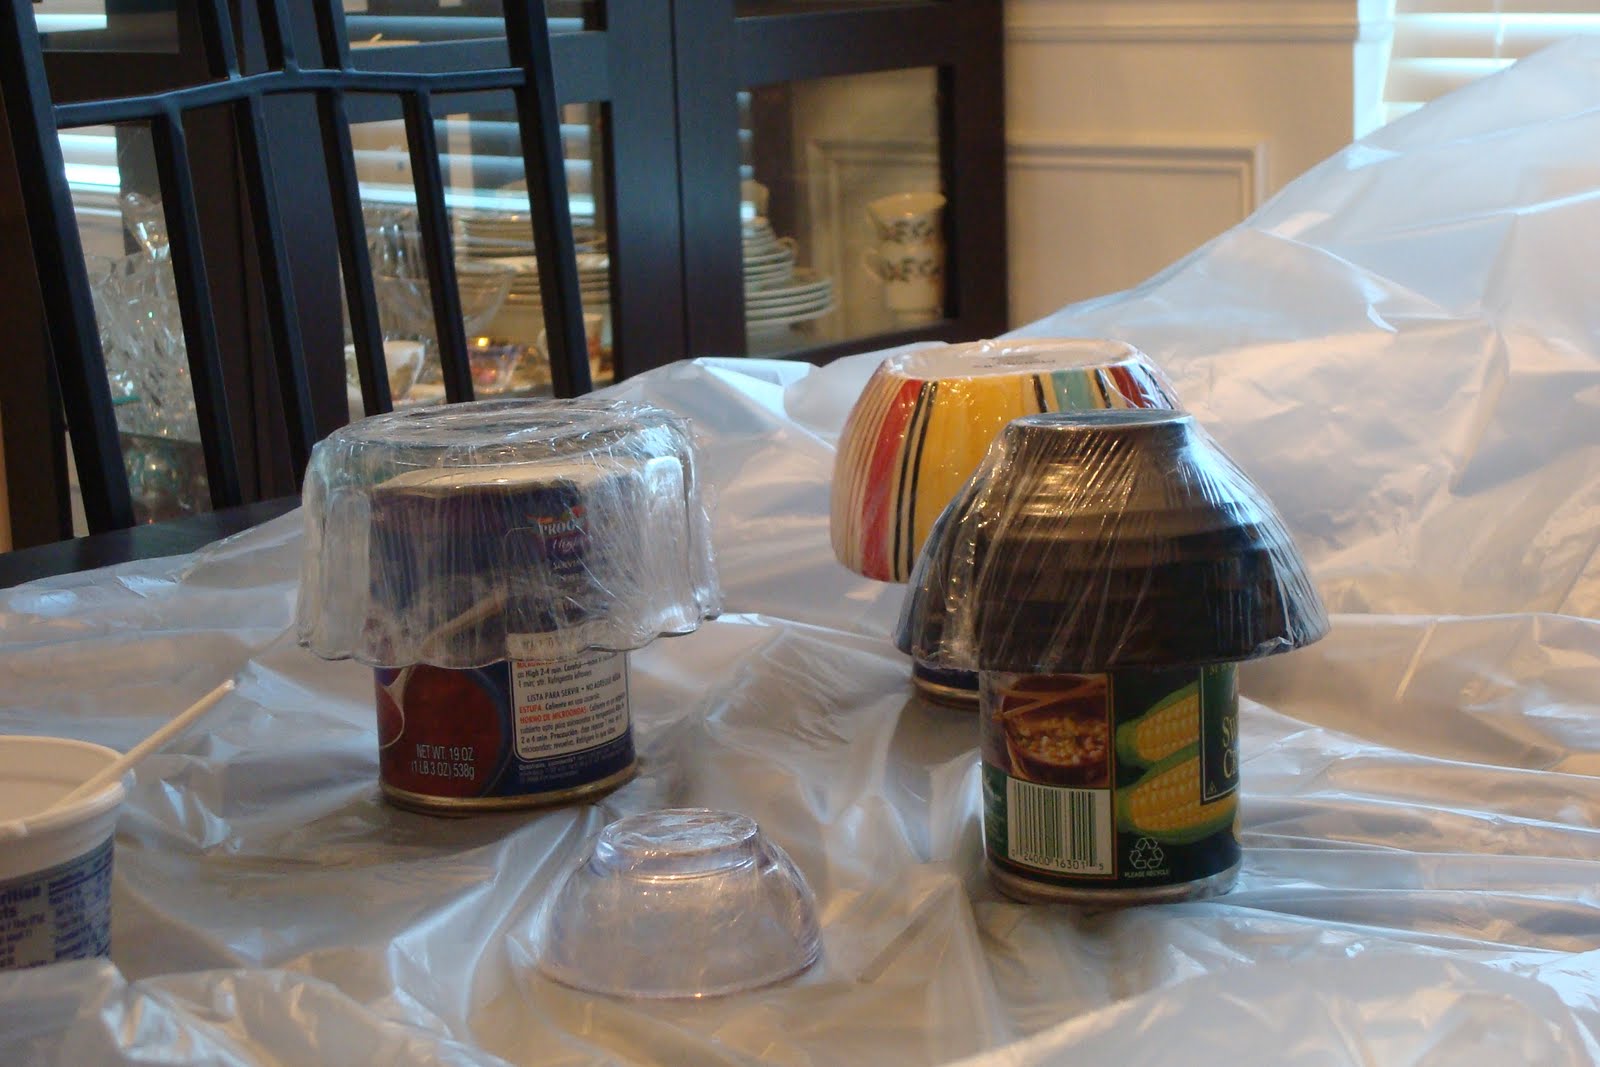
Also, have some stands ready before you start mache-ing! It's not easy to go rummaging in the pantry with watery glue dripping down your arms! I used cans, but I found they rust when you leave them sitting to dry. As long as it elevates your bowl as you're working and then it's drying, you've got a winner!
I mixed my glue in an empty cream cheese container. It was deep enough and wide enough for what I needed. Submerge a handful of your paper in the glue mix and let it sit so the glue can absorb into the paper.
You don't want it falling apart, so a minute or two is plenty. Take one piece, squeeze it through your fingers lightly (you don't want it sopping wet) and put it on the bowl.
I overlapped the pieces and alternated which way I placed them (there's not a whole lot of science to this - well there probably is, I just didn't apply it!)
You will need to do a minimum of six layers (more like 10 for a sturdy bowl!) and I did 2 layers at a time, letting the bowls dry between my crafting sessions. If it's stinking hot (like it is here in Atlanta right now) you might want to put them outside. The big thing is to make sure it is COMPLETELY dry before you pull it off the bowl and do any decorating. If you seal it before it's dry you get nasty moldy ickyness.
Once your bowls are dry, it's up to you what you want to do next. Depending on the type of material you used to make the paper mache, you may like the way it looks just the way it is. You can paint them or do what I plan to do and use images from the comic books to decoupage the outside and inside of the bowls. I plan to seal it with some acrylic spray and will post the results after they're done!
I do have a dream bowl I want to make - I would use a Martha Stewart Living magazine for the mache and then find images of the Craft Diva herself to decoupage. I might even add some glitter glue crowns!

How would you decorate your bowl?

Next craft - (keeping in the comic book theme) recycled paper gift bows!

Sunday, August 1, 2010

Upcycled Comic Book Necklaces


My husband and I are comic book geeks.

A glimpse at our decor
I was always a cartoon and superhero junkie, and in college I got into Neila Gaiman's Sandman series; but I really got pulled into the world of comics when I met Eric and now that's pretty much our lives. A simple example that kind of sheds light on it all... we picked the paint color for our kitchen (you can see our kitchen in one of my previous entries) to match the background of a Tony Harris Batman painting that is framed and hanging in the kitchen. Told you we were geeks!
Despite the fact that I like comic books I do have a slightly sadistic and very sarcastic side of me that likes to poke fun at it all (especially at Eric's expense!) I can not tell you how much pleasure it gives me to chop up comic books (although I usually only use the bad ones) to make these funky necklaces and see the horror on the fan boys' faces when I put them on the table to sell at comic shows. There are a lot of bad books out there and this is a great way to keep them out of landfill.
ALSO!!! My tutorial for these necklaces will be featured on a great new site I found recently that features indie crafters. The site has profiles of crafters, great tutorials, and even GIVEAWAYS!!! Check out http://monsterbites365.com/  this Wednesday, August 3 for a chance to win one of my comic book necklaces. Then, keep going back every day for a chance to win other great stuff and meet cool crafters.

Upcycled Comic Book Necklace

 These necklaces were actually inspired by a project I saw for a bowl made of one very large paper coil. I love geometric designs, but someone suggested I make one of these in the shape of an "X" since I was using an X-Men book at the time. I started with more abstract shapes but finally did the “X”!

Materials:
Comic book
Glue stick
Liquid glue (like Elmer’s)
Large eyed needle
Metal chain
Jump rings
Bamboo skewer (or other similarly shaped and sized stick-like object)
Lobster, spring ring, or other necklace clasp
Jewelry pliers
Rubber bands
Mod Podge (or other sealant for paper)
Small paint brush

Directions:

1. Find a comic book with little or no value. I usually stock up on "Free Comic Book Day"; the first Saturday in May every year comic book stores and other retailers give out books that are stamped "Free Comic Book Day" and are therefore not worth much to collectors. You can also use magazines, catalogs, or anything that has color. Each page of the comic book is about 6 5/8" by 10 1/8". I cut each page into 3 strips lengthwise (a hair shy of 2 ¼” wide). I used a guillotine cutter to make it easier, but scissors work nicely too!
Here's a pile of the strips cut to the right size.
2. Take each strip, fold it in half lengthwise, and then fold the outsides in to the center seam.
3. Lightly glue each strip (I use a glue stick) down the quarter flaps and the middle and press it together so that it's flat. I usually weight the strips under a heavy book or something of a similar weight for about 10 minutes to keep them flat.
 5. Once your strips have dried, tape several together end-to-end. I wrap the tape around the paper completely. I wish I could find a better method because the tape is a little unsightly in the coil, but glues don't seem to get the job done the way I want. Note: I have used 2, 3, and 5 strips to make coils of different sizes.
6. Now the frustrating, I mean fun part. Start coiling your strips. I start mine around a bamboo skewer to get a nice round hole in the center. When you've coiled it around about 5 times you can pull it off the skewer and keep coiling. Pull it tight as you go and get ready for some to pop out of your hands and come undone! I don't glue along the way because it makes it really messy.

7. When you're done, put a line of liquid (i.e. Elmer's) glue along the inside of the last inch or so of the coil. Smooth it out and wrap a rubber band around it fairly tightly to let it set. I find 5 minutes is usually good enough and I can pull the rubber band off to use on my next coil.
Here's a coil drying with the rubber band wrapped around it.
8. With a fairly stiff brush, coat each coil with Mod Podge. I do one side, forcing the Mod Podge in between the layers, let it dry and then turn over and do the other side. You can use your bamboo skewer to clean out the center hole.
9. After your coils have dried, arrange them in a pattern. I try to turn the seams in and usually tack them together with some glue.
10. Find an interesting thread and stitch away between the coils. I used cotton embroidery thread on the fuchsia one. I used a larger gauge beading needle and made three passes at each coil to coil seam. I wasn't able to do it in one continuous line of stitching, so there are some knots on the back. GLUE YOUR KNOTS!!!
11. I also made passes over the outer edge of the top coils so I could attach my jump rings. Use your pliers to open the rings and thread them underneath your stitches. Close the jump rings.
12. Attach your chain to the jump rings, add a clasp, and it is ready to wear!
This is another one I made using olive green thread.