Monday, July 19, 2010

Upcycling Wine Bottles - The Process Part 2 - Drilling and Assembling


So I have to apologize for being THREE WEEKS (PLUS!) behind on this post. I have a really good excuse... there was a family July 4th celebration with feuding neighbors (and cops!), then a day job trip to California, and, oh yeah - my Dremel and camera batteries were dead! And then there was a surprise visit from our friend The James. See, perfectly legitimate reasons for not getting my stuff done. HA!
Hopefully you didn't give up on me! Let's finish our project...

We left off with cut and ground glass bottles. The next steps are drilling holes in the punt and bottom of the bottle, washing the grit off, getting any leftover label goo off, and finally assembling the wind chimes.

Do you know about Harbor Freight Tools? It's a fantastic store full of cheap tools and random garage/outdoor things (hamburger patty presses were across the aisle from a really dull machete!) The stuff there is super-cheap, but don't count on it lasting you forever. When working with glass, you really need diamond tip saw blades and drill/rotary tool bits. One single Dremel brand diamond tip bit is $11.97 at Home Depot; I got this set of 20 different bits from Harbor Freight for $7.99.
The tips worked great for a while, then they started slipping in my Dremel; it got so bad that any pressure would make the bit slip. I thought it had to be the cheap bits, so I bought another pack of different ones for $4.99 and brought them home to try out.
I use a Dremel drill press to keep the bit from chattering while it bites into the glass.
You always want to drill glass with water, so I use a small plastic container deep enough to allow the punts and bottoms to be submerged while drilling.
I used the 1/8" bit for the bottoms and the 1/16" bit for the punts since they're a lot smaller.

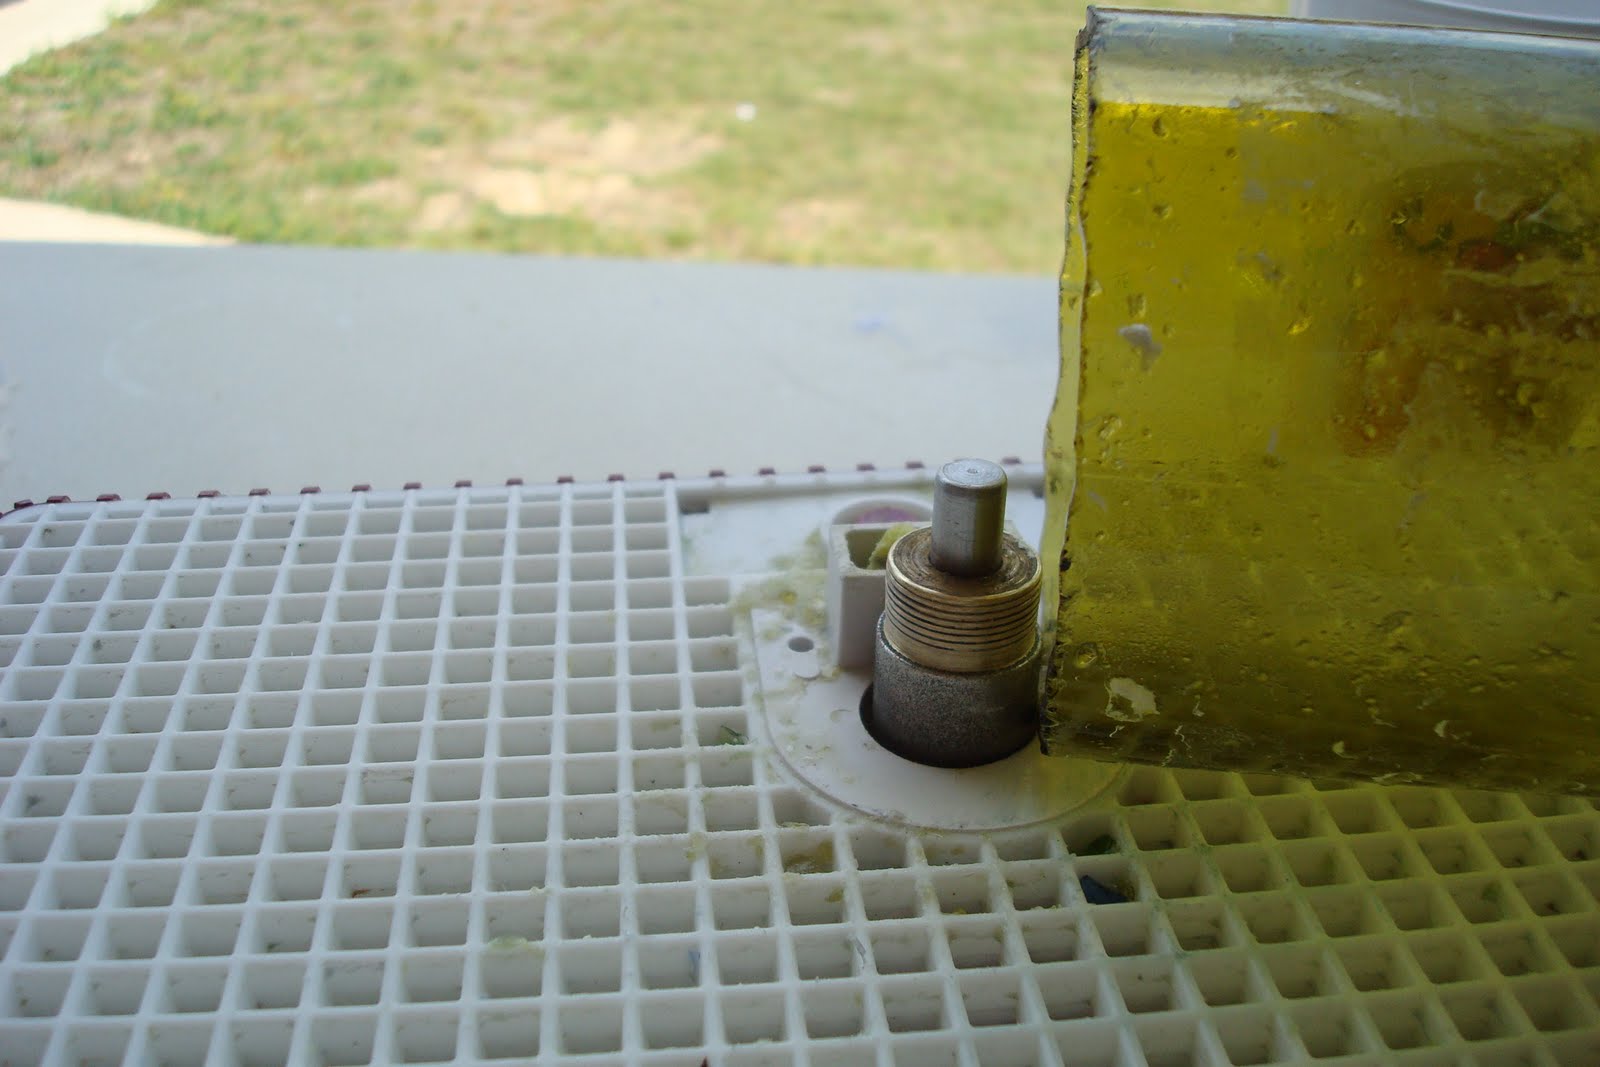
The punts are easy to do. Since they're domed, they almost act like a compass; when you put them in the water they usually trap an air bubble under the dome (make sure the dome is facing down).
This really makes it easy to find the center. Start with light pressure and lift your bit periodically out of the hole to let the water flow over it. You'll find your sweet spot for pressure after a few practice runs. You don't want it to be too light, but let the diamond bit do all the work. I usually set my Dremel speed on 4 - 5.
Your water will start to get cloudy from all the grit. That's okay until you can't see what you're drilling anymore. Be careful where you dump it, though because you may have some small shards of glass.
(See the pieces of green glass?)
I thought this punt was awesome! See the 3 little wine bottles design? I almost hated to drill it... almost!
Now let's talk about the bottoms. These are pretty thick hunks of glass and you have to be strategic about where you drill. There's usually a "moat" created when you cut off the punt; this gives you a thinner area to drill. Turn the bottom down so you're drilling into the "moat" (you don't want to drill flat and make a whole in your plastic container!) This is where it's really important to lift the bit every so often since you're dealing with a bigger whole and thicker glass than the punt. Again, use pressure but don't force it, let the bit do its job.
Once you have your punts and bottoms drilled it's time to clean up! Remember you're basically dealing with melted sand, so the grit that comes from the holes is very fine and very messy - you'll need some elbow grease! I fill the sink with warm soapy water and use a baby bottle cleaner for the insides of the bottles and a cloth for the bottoms and the punts.
This is a great time to check for cracks. Cutting and drilling has put stress on the bottles and if they crack that crack will run.
(it's hard to see the crack on this one, but it's there)
 If you're careful you can salvage a cracked bottle for a suncatcher but don't expect it to make a pretty sound (more of a dull "thunk" than a delicate "tinkle"). Sometimes if a punt is cracked the glass will just crumble away and you'll lose it. In this batch of bottles I lost one bottle and one punt.

Dry your bottles (I just put mine on the counter to air dry since I was out of time to work on them for the evening). Don't be surprised after they're dried if you have to wash them again, I tell you that grit is tough!

Next step is getting the rest of the label goo off. You'll think your bottles are clean, but trust me they're not. Touch them! Are they sticky? If so, that needs to come off! I said before I wished I could find a better cleaner, but right now the Goo Gone is about the best thing I have. I tried nail polish remover but it didn't work as well. Even with the Goo Gone it takes some scrubbing and a couple of passes - guess the wine companies don't want their labels coming off!
Now that we're squeaky clean we can assemble the chimes. I've done three batches of chimes so far and the assembly method for each one has been different.

For the first batch I drilled two holes through the neck of the bottle and then created a twine contraption that had one loop going through the neck holes (HA! that reminds me of vampires!); then I strung the punt on another longer piece of twine and knotted the twine above and below the punt; I fed the twine through the bottom of the bottle and knotted it several times; finally I had to tie the hanging piece to the loop through the neck. It wasn't very elegant, but it worked.

For my second batch, I had been to the Cherry Blossom Festival in Macon and saw a guy selling wine bottle lanterns (I'll be making some next). He was using a smaller gauge chain and two sizes of split rings (the rings on key chains). The smaller ring was used to hang the bottle and the larger one worked as a stopper going from the body of the bottle up into the neck. BRILLIANT! I got my split rings at Wal-Mart in the crafts section; they also have them at Michael's with the summer crafts.
The only problem was the chain added extra "clanging" against the glass that detracted from the pretty "tinkle" of the punt. So on to round three.

With this batch I went back to twine but I'm still using the split rings.

I had a nice ball of twine, but the cats got to it, so I just have to cut off what I can.
I cut a piece about 3 feet long and double it up. Tie the top of the twine to the larger split ring; I'm not a knot expert so do it however works best for you as long as it doesn't slip!
About 3 - 4 inches down tie a good sized knot. String the punt (dome down) onto the doubled twine and tie another knot below it - you want to keep the punt from sliding.

Come down another 6 - 8 inches (it's all preference) and string the twine through the hole you drilled in the bottom of the bottle. Now you could certainly avoid drilling that hole and just thread your twine through the hole in the middle left by the punt, but I like the way it hangs with the extra hole. Whatever you do make sure your knots are tight and don't slip.
Cut another piece of twine about 12" - 18" long. Tie it to the opposite side of the large split ring and thread the entire thing up through the bottle of the neck. The split ring will stop it from feeding through the neck.
Leave about 2 - 4 inches of twine out of the bottle (again it's your preference) and tie on the smaller split ring.
Voila - you now have a beautiful upcycled wind chime! It's amazing that each one sounds so different.

These have been a hit at the craft shows that I've done. Up until now I haven't listed them on Etsy, but I think I will. If you're interested in buying one, here's the link to my shop: http://www.amica813.etsy.com/. I'll try to have them listed this week.

My next project still involves upcycling glass bottles, but I'll be making lamps (electric) and lanterns (candle)!

If you try your hand at the chimes, let me know how it goes!

Monday, July 12, 2010

Upcycled Glass Bottle Windchime Part 1.5

So, when you are getting ready to craft something for your blog, make sure ALL of your batteries are charged... not just the Dremel you will be using, but also the camera battery!

In other words, sorry I haven't finished up the project! Everything is charging, so check back soon!

Monday, July 5, 2010

Upcycling Wine Bottles - The Process Part 1 - Cutting the Glass


We're wine drinkers around here. Sometimes we get good wine and we savor it; sometimes we get not so good wine and we dump it! Either way we end up with a lot of empties. I was using them for decorations until I started running out of cabinet space!
I love glass arts; I had a brief attempt at doing stained glass comic book heroes, but for a beginner Spider-Man has a lot of curves! I kept all my materials though because I knew they would come in handy someday. I'm fascinated by slumped glass and fire polished glass (check out this AWESOME Etsy shop for upcycled glass) and would love to learn to work with it, but alas a kiln is out of my budget right now. I had seen some wind chimes done with slumped bottles but I wasn't fond of how they looked and since I didn't have the kiln the method was out anyway. But after a vacation to Napa and Sonoma last year
I wanted to do something crafty with our bottles so I started chewing on ways to make the windchime and came up with these.
Once I started on the windchimes, my friends started scoping out cool bottles for me. My friend Steff went dumpster diving for the cool blue wine bottle and the Skyy vodka bottle (I think it will become a lantern)!
There are several ways to cut a bottle; many use those 70's bottle cutters, some people use acetone on a string, some use candles, but I found this tutorial on Instructables and since I already had a tile saw, I went with it! I would like to try the bottle cutter method but I can't see spending $25 for one. The pros of the bottle cutter are that you get a really clean cut; the cons are that you lose a lot of bottles if it doesn't break perfectly. If I come across a cheap one at a yard sale, I'll definitely pick it up and give it a try, though. The pros with the tile saw (for me) are that it's quick and it rarely breaks a bottle, also I use the punt (the little bump in the bottom of the wine bottle) as the "clanger" for the wind chime and I haven't been able to figure out any other way to cut it off.
The cons are that the cuts aren't that clean and I end up having to grind the glass (fortunately I have a grinder on hand). I would love to be able to fire polish the edges, but that requires a kiln which we already know the story with that. For now, they'll just have to be "rustic".
The first step in the process is to wash your glass. I've found through trial and error that it's a lot easier to get the labels off before you cut the glass than after. I still haven't perfected the method, but this time around I soaked them in hot water for 5 - 10 minutes and then used a razor blade to scrape off the labels.
I would love to leave the labels on, but since I use a wet saw to cut the bottles they don't really stay intact. (Any suggestions for preserving them?) I still end up with adhesive left on some of the bottles and end up cleaning them up with GooGone; I'd rather not use it but I haven't found anything better. 
Now you're ready for the power tools! I cut the bottoms and the punts off with the wet tile saw. Make sure you have eye protection!!!!! (Also, earplugs and a respirator wouldn't hurt. Although the saw and grinder use water, silica dust in your lungs is a BAD thing!)
I also wear a plastic apron because chips of glass fly everywhere! I usually separate the bottle from the bottom, then run the bottom through again (very carefully) to remove the punt. Some bottles have smaller punts and this can be tricky. You'll be surprised at how messy this is so I always try to do it outside. I used to set up on the back patio but even after sweeping there would be glass chips left all over the place and that's not good for puppy paws!
As I mentioned before, the tile saw does not make the cleanest cuts so you have to fix that with a glass grinder. This is probably my least favorite part because it takes some time and I am very impatient! I grind the punt - standing up to remove burs and then flat around the edges:
I grind the inside ring of the bottom where the punt was and then stand it up on its side and go around the edge:
 
Finally I grind the bottle itself. I try to smooth out the cut as much as possible, this way no one gets hurt!
Every bottle cuts differently (I find that the thicker the glass, the cleaner the cut), so you need to take your time grinding. Run your finger around all of the exposed edges. They won't be perfectly smooth, but no one's going to be licking these (hopefully!) so as long as your finger comes out okay, you're good to go! (Have the band-aids handy, just in case. HA!)
After I grind, I usually clean the bottles. Just rinsing them doesn't get all the gook off so it takes a couple of rounds. First I rinse them off outside with the hose and try to get the glass chips off.

(They're so beautiful in the sun!)
I will also take them into the sink and put them in warm soapy water, but I don't want the big chunks of glass going down my disposal. I use a baby bottle scrubber to get the inside of the bottle clean.
Some tips: I put each complete bottle (bottle, bottom, and punt) in a grocery bag to keep them together and protect them a little.
(It's also nice to have a wine box with dividers around!)
There's one more glass cutting step, and that's drilling some holes with a diamond bit on my Dremel. I'll pick up with that on the next post and we'll start assembling! In the meantime, chugalug pooh bear! Go get some vino and get to work!
Georgia Wine Festival 2009
(at some point I think I had a glass in both hands)